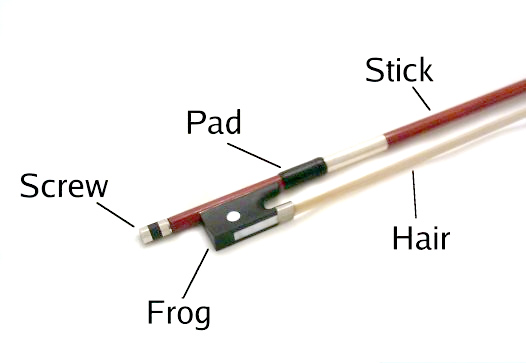
The first lesson to learn is the parts of the violin. This will help in later lessons as I refer to the parts by name.
As a beginner, it is not yet necessary to purchase a shoulder rest. For now, you can hold the violin up with your hand. The left hand holds the neck of the violin between the thumb and index finger. The fingers rest on the fingerboard and the chin rests on the chin rest. The bow is held in the right hand with the top four fingers going from the screw to the pad and the thumb on the frog.
See image below to check your positioning. Note: make sure to sit/stand as straight as possible. Good posture will make this easier.
Now try it for yourself! Take about 10 minutes to practice holding the violin and bow until you feel comfortable.
Now that you have learned the parts of the violin and how to correctly hold it, we can move on to the strings. There are four strings on the violin. When you're holding it, the strings will go from left to right: G, D, A, E.
The pegs at the top and the fine tuners at the bottom are used to tune the strings. This should be done every time before you start to play. If you have never done this before, I would recommend purchasing a battery operated music tuner. This definitely takes practice.
Hook the tuner to one of the pegs and pluck a string. The tuner will show you which note it is playing. For example, if you pluck the D string but the tuner reads an A, you know that your string is out of tune and you need to make adjustments. The strings read from lowest to highest from the G to the E string. The E is very, very high and the G is very, very low.
Take a few minutes to practice.
Lesson 3
This lesson will focus on scales so students can practice putting the bow to the string to make music. This will also be the first step to reading music. But first, let's learn to read music.
This is called a music staff. The top 4 represents how many beats per measure and the bottom 4 tells which note gets the beats. Next, it is important to know the different notes.
As you can see, all the notes in this scale are half notes which means they each get 2 beats per note.
This image one octave of the D scale. the ## are showing that there are two sharps in the scale. That means that finger placement will be farther apart and the note will be a tad higher that usual. The fingers are labeled 1-4 and the notes are also labeled 1-4 to show you which finger goes the notes.
The 0 represents an open string. This scale is started on the D string.
Lesson 4
Now you are ready to play some music!
I know that when I was first learning to play, it was very helpful to write the note name above the notes until I knew them on site. I suggest you give that a try if you don't already have the notes memorized. The first song we will learn is Mary Had a Little Lamb.
Good job! Now lets try Twinkle, Twinkle, Little Star.
This one already gives you the notes and some fingerings as well. Practice both songs 3x each. Great job. I'm happy to be a part of your musical journey and I wish you the best of luck
There are corresponding evaluations on the home page that will be beneficial to you and can gauge if you are on the right track and help you understand what needs improvement.


No comments:
Post a Comment